
")

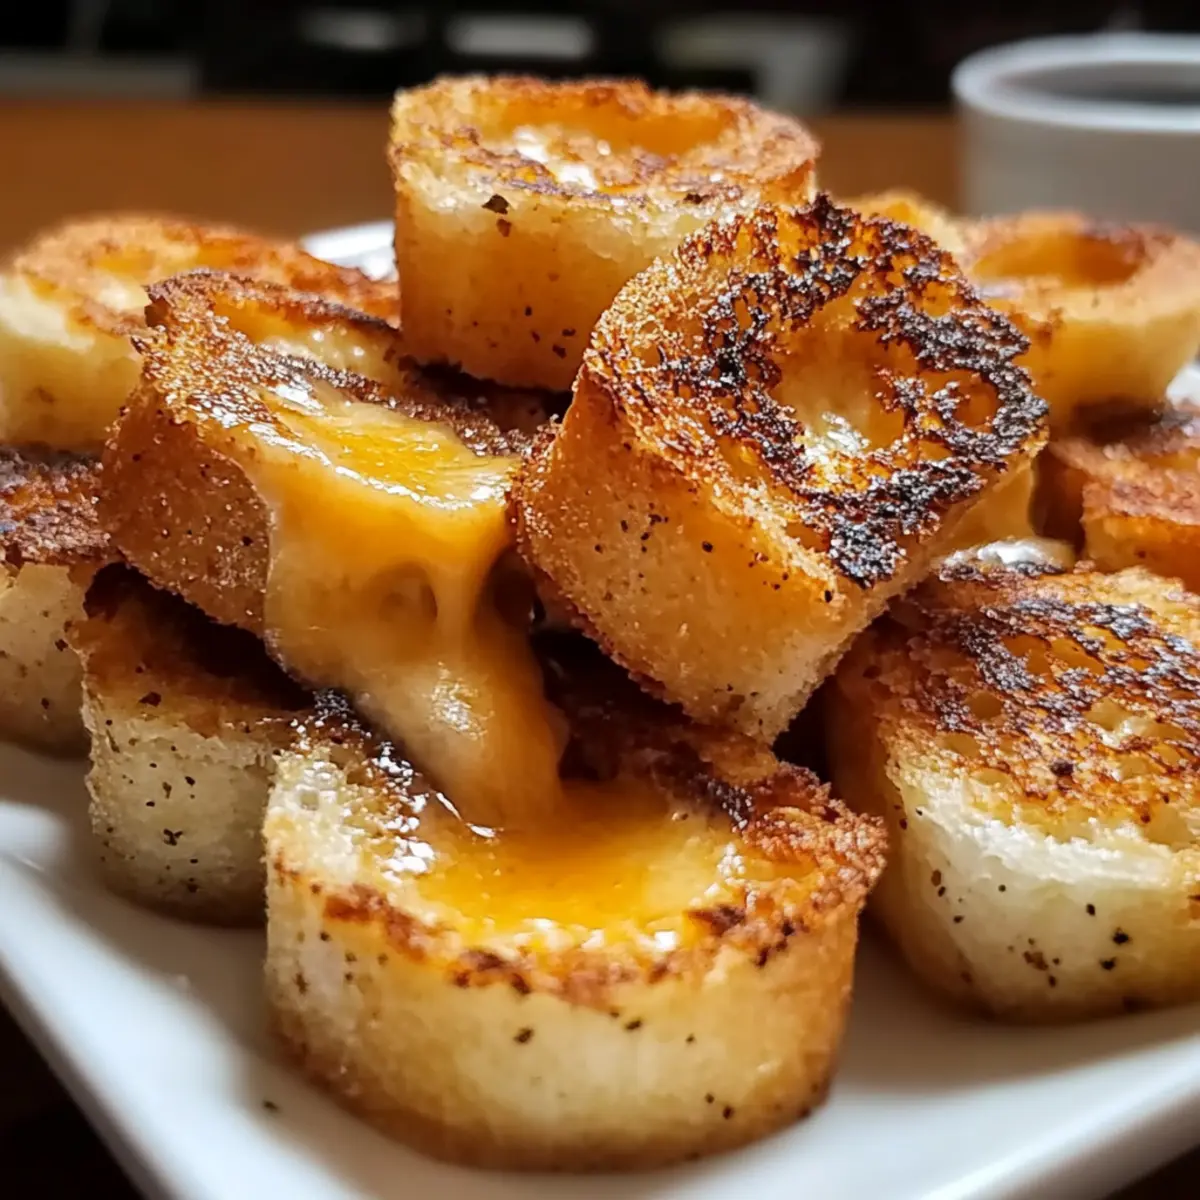
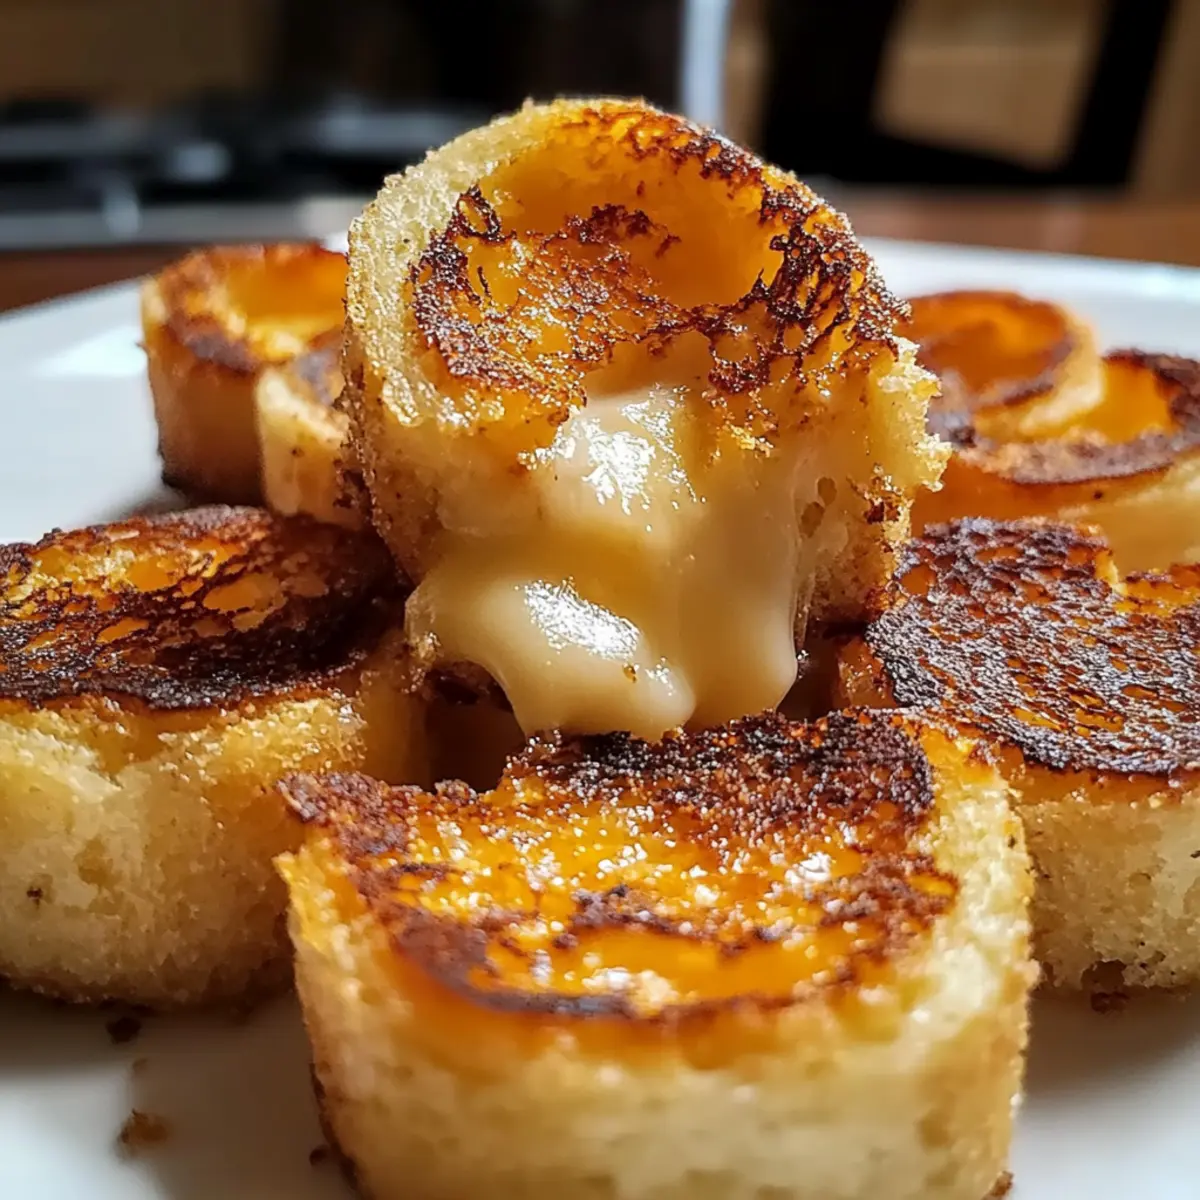
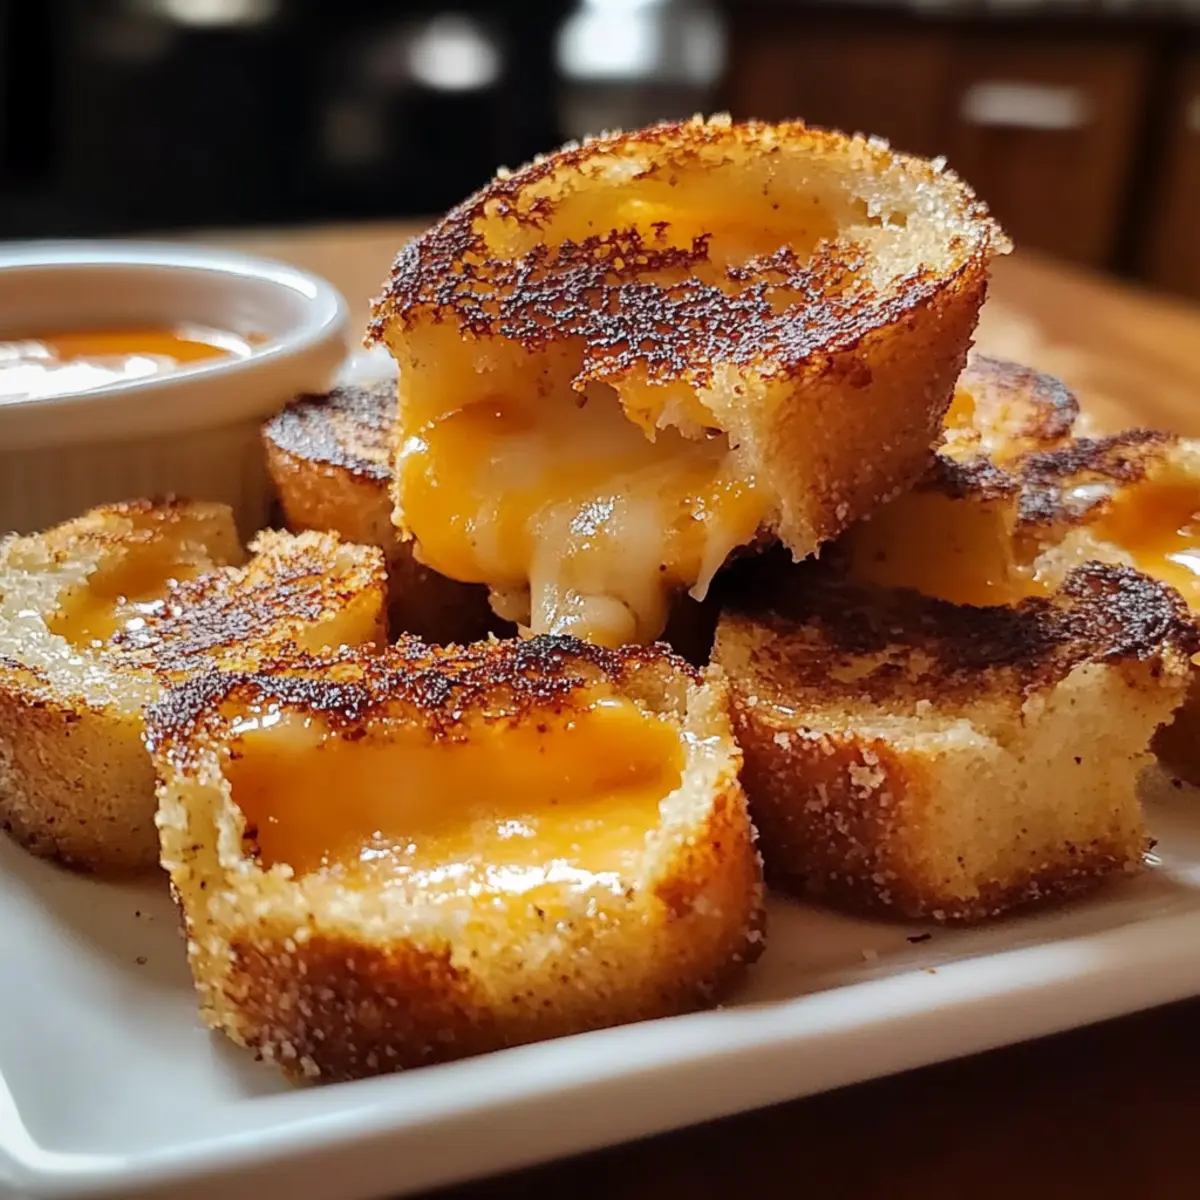
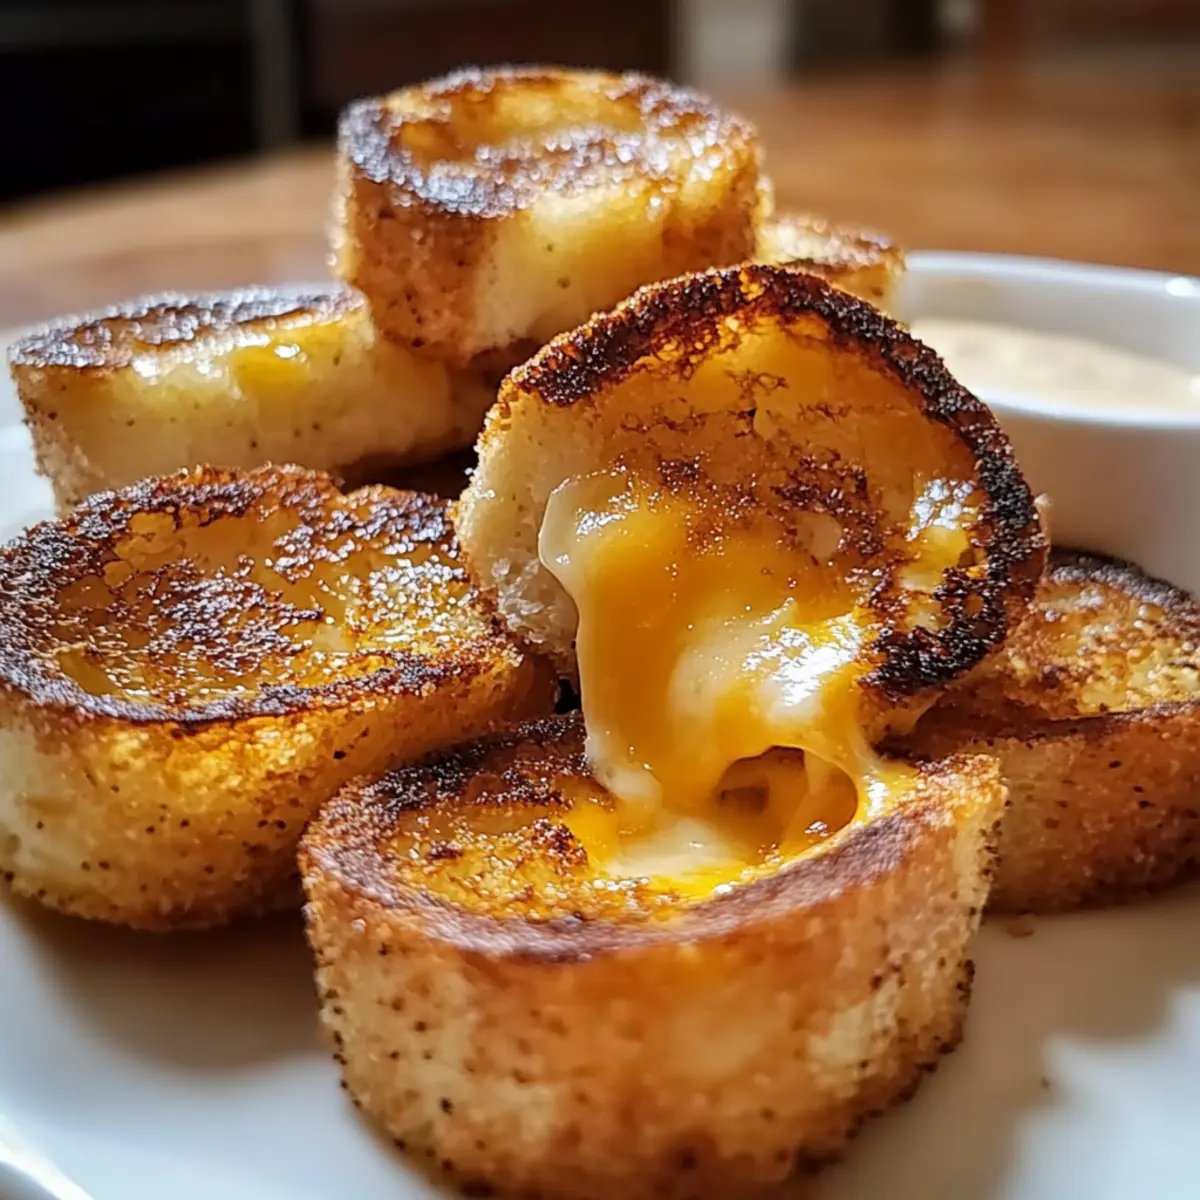
As I stood in my kitchen, the aroma of sizzling butter filled the air, whisking me back to childhood memories of cozy family dinners. Today, I’m excited to share my twist on a beloved classic: Mini Grilled Cheese Dippers! These crispy little bites are the perfect appetizer for any occasion, whether you’re hosting friends or just looking to enjoy some comfort food at home. With a gooey cheese center and the option to make them gluten-free, this recipe checks all the boxes for quick preparation and crowd-pleasing appeal. Imagine dipping these delightful morsels into a steaming bowl of tomato soup or your favorite sauce. Ready to bring a touch of nostalgia to your table? Let’s dive into this cheesy goodness together!
Why Are Mini Grilled Cheese Dippers Perfect?
Comforting, nostalgic flavors: These Mini Grilled Cheese Dippers deliver a delightful twist on an all-time favorite. Quick to prepare: In no time, you’ll have a tasty appetizer ready for any get-together. Gluten-free option: Easily adapt the recipe to accommodate dietary needs, making them accessible for everyone. Versatile pairings: They pair wonderfully with tomato soup or marinara, elevating your snacking experience. Crowd-pleaser appeal: Watch as family and friends rave about these bite-sized delights at your next gathering!
Mini Grilled Cheese Dipper Ingredients
For the Dippers
- Bread – Opt for sturdy sourdough or whole grain; gluten-free bread ensures everyone can enjoy these mini grilled cheese dippers.
- Sharp Cheddar – Use in a 2/3 ratio for a flavorful punch; its strong taste perfectly complements the other ingredients.
- Provolone – A third of your cheese blend will provide that heavenly melt; it has a creamy consistency that enhances every bite.
- Butter – This will achieve that perfect golden crust; it’s the secret to irresistible crispiness that makes these dippers memorable.
Optional Ingredients

- Deli Meats – Thin slices of ham or turkey can elevate flavor; experiment for a heartier snack.
- Fresh Herbs – Adding basil or chives will introduce a fresh note; they bring a lovely brightness to each bite.
Feel free to get creative with these ingredients as you craft your perfect Mini Grilled Cheese Dippers! Whether you stick with the classic blend or opt for exciting variations, these little delights promise warmth and comfort in every delicious dipping experience.
Step‑by‑Step Instructions for Mini Grilled Cheese Dippers
Step 1: Prepare the Bread
Start by slicing your sturdy bread into small squares, about 2 inches in size. This size is perfect for dippers and helps ensure a delightful crunch. If you’re using gluten-free bread, make sure to select a brand that holds its shape well while toasting. Set the squares aside on a clean cutting board or plate.
Step 2: Assemble the Sandwiches
Layer your cheese blend, consisting of 2/3 sharp cheddar and 1/3 provolone, between two squares of the sliced bread. Ensure the cheese reaches the edges for maximum gooeyness. Gently press the sandwich together to meld the ingredients. Repeat this process until all the bread squares are filled, creating a stack of mini grilled cheese sandwiches.
Step 3: Heat the Pan
In a large skillet, add a tablespoon of butter over medium heat. Allow the butter to melt, swirling it around the pan to coat the surface fully. You want the butter to bubble gently without browning, as a perfectly heated pan is crucial for achieving that golden-brown crust on your Mini Grilled Cheese Dippers.
Step 4: Grill the Sandwiches
Carefully place the assembled sandwiches in the hot, buttery skillet, leaving space between each to avoid overcrowding. Grill them for about 2-3 minutes until the bottom is golden brown and crispy. Keep an eye on them as they cook to ensure an even, delicious crust forms on each sandwich.

Step 5: Flip and Finish
Using a spatula, gently flip each mini grilled cheese sandwich to grill the other side. Cook for an additional 2-3 minutes, watching closely until they are equally golden brown and the cheese begins to melt. This step is vital for ensuring all sides are perfectly crisp and inviting.
Step 6: Rest and Slice
Once both sides are beautifully golden and the cheese is melty, transfer the sandwiches to a plate lined with paper towels to absorb any excess butter. Allow them to rest for about 1 minute before slicing them into strips or dippers. This resting period helps the cheese set slightly while keeping the sandwiches warm.
Step 7: Create the Dippers
Arrange your sliced Mini Grilled Cheese Dippers on a serving platter. For a fun twist, serve them alongside a steaming bowl of tomato soup or your favorite dipping sauce. The combination of crispy bread and gooey cheese, paired with a warm dip, creates a delightful culinary experience everyone will love.
Step 8: Serve Immediately
To enjoy these comforting Mini Grilled Cheese Dippers at their best, serve immediately while they are still warm and crispy. Their delectable aroma and beautiful golden color will entice your guests, making them a perfect addition to any appetizer spread or cozy meal at home.
How to Store and Freeze Mini Grilled Cheese Dippers
Fridge: Store leftover Mini Grilled Cheese Dippers in an airtight container for up to 2 days to maintain freshness.
Freezer: For longer storage, freeze the dippers in a single layer on a baking sheet, then transfer to an airtight container or freezer bag for up to 2 months.
Reheating: Reheat in a non-stick skillet over medium heat for 3-5 minutes or in an air fryer at 350°F for about 5-7 minutes to preserve crispiness.
Serving After Storage: For the best taste, serve the reheated dippers with a side of tomato soup or your favorite dipping sauce for a delightful experience.
Expert Tips for Mini Grilled Cheese Dippers
-
Perfecting the Grill: Keep the heat at medium-low. This avoids burning the bread before the cheese has a chance to melt properly, resulting in a better Mini Grilled Cheese Dippers experience.
-
Space Matters: Avoid overcrowding the pan. Give each sandwich enough room to cook evenly so that every dipper achieves that desired crispiness and golden-brown crust.
-
Use the Right Bread: Choose a sturdy bread like sourdough or whole grain. This helps hold together the gooey cheese inside without falling apart during cooking.
-
Fat for Flavor: Coat the bread lightly with butter or mayonnaise before grilling. This not only adds flavor but enhances the crispy texture many love in these dippers.
-
Cheese Selection: Experiment with different cheeses for variation. Try Gruyère for a nutty flavor or mozzarella for extra stretchiness—keep it fun and cheesy!
Mini Grilled Cheese Dippers Variations
Feel free to explore these delightful twists on the classic recipe that will make your taste buds dance!
- Gluten-Free: Use gluten-free bread to make this dish accessible for everyone, ensuring no one misses out on cheesy goodness.
- Cheese Swap: Try Gruyère or mozzarella for a different flavor profile; each cheese offers unique meltability and taste. Imagine the nutty flavor of Gruyère transforming your dippers into a gourmet treat!
- Herbed Up: Stir in fresh herbs or spices like basil or garlic powder for an aromatic twist; this elevates the flavor and adds a fresh layer to each bite.
- Veggie Boost: Thinly slice tomatoes or add spinach between the cheese layers for a nutritious boost; the fresh vegetables give your dippers a delightful crunch and color.
- Deli Delights: Incorporate your favorite deli meats like ham or turkey for a heartier option; this exciting addition makes the dippers a perfect hearty snack.
- Sweet Twist: Add a touch of sweetness with a drizzle of honey or balsamic reduction before serving; this unexpected flavor combination will surprise and delight your guests!
- Spicy Touch: Sprinkle in some red pepper flakes or jalapeños for a bit of heat; these dippers can become an exciting appetizer for spice lovers.
- Savory Towers: Make mini stacked sandwiches with different layers of cheese and add roasted red peppers for a flavor complexity that will impress!
Let your creativity flow as you make these Mini Grilled Cheese Dippers! Whether you opt for classic flavors or venture into exciting variations, these little bites promise to deliver warmth and comfort in every delicious dipping experience. Enjoy them alongside your preferred sauce for a perfect taste sensation!
What to Serve with Mini Grilled Cheese Dippers?
Elevate your snacking experience with delightful pairings that complement the crispy, gooey goodness of these dippers.
- Tomato Soup: A classic companion that adds warmth and comfort, perfect for dipping and savoring every bite.
- Marinara Sauce: This tangy sauce brings a zesty twist, enhancing the cheesy flavors while offering a burst of freshness.
- Avocado Salad: A cool, creamy salad balances the richness of the dippers, providing a refreshing contrast with each bite.
- Roasted Vegetables: Serve a platter of crispy roasted veggies for an earthy touch, adding a delightful crunch and flavor contrast.
Sip away!
- Sparkling Lemonade: The bright and bubbly nature of this drink pairs beautifully, cutting through the richness of the cheese.
- Craft Beer: A hoppy beer elevates the eating experience with its bitterness, providing a wonderful contrast to the cheesy dippers.
- Chocolate Fondue: End your indulgent meal on a sweet note—because who wouldn’t want to dip sweet treats after their savory bites?
Make Ahead Options
These Mini Grilled Cheese Dippers are perfect for meal prep, saving you precious time on busy weeknights! You can assemble the sandwiches and store them in the refrigerator up to 24 hours in advance. Simply layer the cheese between your sliced bread, then lightly wrap them in plastic wrap to prevent drying out. When you’re ready to cook, heat your skillet with butter and grill the dippers as instructed. To maintain that delightful crispiness, avoid overcrowding the pan and keep an eye on the heat to prevent burning. With this prep method, you’ll enjoy charming, gooey, and crispy dippers with minimal effort, ideal for last-minute entertaining!
Mini Grilled Cheese Dippers Recipe FAQs
What type of bread should I use for the best Mini Grilled Cheese Dippers?
I recommend using sturdy bread like sourdough or whole grain, which can hold up against the gooey cheese inside. If you need a gluten-free option, look for gluten-free bread that is thick enough to maintain its structure while toasting, ensuring a delightful experience for everyone!
How do I store leftover Mini Grilled Cheese Dippers?
Store leftover dippers in an airtight container in the refrigerator for up to 2 days. To keep them fresh and delicious, make sure they cool completely before sealing them up. Enjoy them with some dipping sauce for a satisfying snack!
Can I freeze Mini Grilled Cheese Dippers?
Absolutely! For freezing, place the cooled dippers in a single layer on a baking sheet and freeze them until solid. Then, transfer the frozen dippers to an airtight container or freezer bag. They can be stored for up to 2 months. Just remember to label the bag with the date!
What’s the best way to reheat frozen Mini Grilled Cheese Dippers?
To reheat, place the frozen dippers in a non-stick skillet over medium heat for about 3-5 minutes, flipping them carefully until they’re golden and crispy. Alternatively, you can air-fry them at 350°F for about 5-7 minutes for a delightful crunch.
Can I use different types of cheese in my Mini Grilled Cheese Dippers?
The more the merrier! Feel free to experiment with different cheese blends for unique flavors. Gruyère adds a nutty profile, while mozzarella offers gooey stretchiness. Just remember to maintain a balance between flavor and melting quality for that unforgettable comfort food experience!
Are Mini Grilled Cheese Dippers suitable for a gluten-sensitive diet?
Yes, simply opt for gluten-free bread to make Mini Grilled Cheese Dippers accessible for those with gluten sensitivities. Just be sure to check the packaging and pick a brand that specifies gluten-free to ensure everyone can indulge in these delightful, cheesy bites!

Mini Grilled Cheese Dippers for a Cozy Comfort Food Treat
Equipment
- Skillet
Ingredients
For the Dippers
- 4 slices Sourdough or Whole Grain Bread Gluten-free option available
- 2/3 cups Sharp Cheddar Cheese Use for flavor
- 1/3 cups Provolone Cheese For melty texture
- 2 tablespoons Butter For grilling
Optional Ingredients
- Deli Meats Thin slices of ham or turkey
- Fresh Herbs Basil or chives for garnish
Instructions
Step-by-Step Instructions
- Slice the bread into small squares, about 2 inches in size.
- Layer the cheese blend between two squares of the sliced bread.
- Melt butter in a skillet over medium heat.
- Grill the sandwiches in the skillet for about 2-3 minutes until golden brown.
- Flip and cook for an additional 2-3 minutes until both sides are golden.
- Transfer to paper towels to absorb excess butter and let rest for 1 minute.
- Slice into strips or dippers and serve with tomato soup or dipping sauce.
- Serve immediately while warm and crispy.