
")

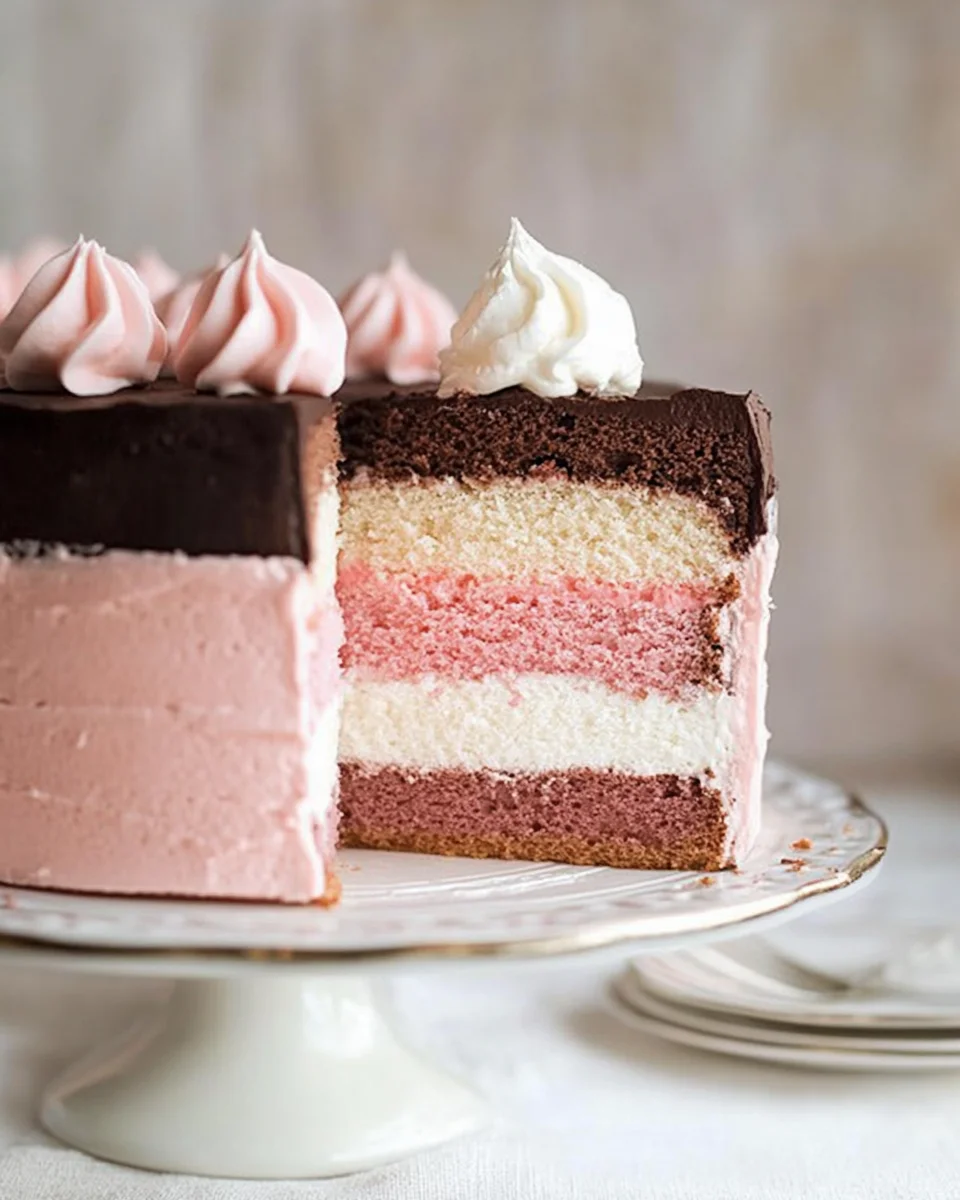
Neapolitan cake is a nostalgic, visually striking, and incredibly delicious dessert inspired by the classic Neapolitan ice cream. With layers of rich chocolate, sweet vanilla, and fruity strawberry, this cake is a true celebration of flavors, bringing together the best of all worlds in every bite.
This cake is not just a treat for the taste buds but also a show-stopping centerpiece for birthdays, celebrations, and special occasions. The combination of flavors, the seamless buttercream stripes, and the playful ice cream cone topper make it a dessert that is as beautiful as it is delicious.
In this article, we will explore the essence of the Neapolitan cake, its origins, expert baking tips, frequently asked questions, and why this triple-layered treat deserves a place in your dessert repertoire.
The Sweet History of Neapolitan Flavors
The origins of Neapolitan desserts trace back to 19th-century Italian immigrants who brought their gelato-making expertise to the United States. They introduced the concept of combining different ice cream flavors in one serving, inspired by the tri-color Italian flag. Traditionally, Neapolitan ice cream consisted of pistachio, vanilla, and chocolate. Over time, the flavors evolved, and strawberry replaced pistachio, creating the familiar trio we know today.

Taking inspiration from the ice cream, bakers crafted the Neapolitan cake, layering the three flavors into a single dessert. This innovative idea allowed cake lovers to enjoy multiple flavors without having to choose just one. Today, the Neapolitan cake is a beloved treat that continues to captivate dessert lovers with its delightful combination of flavors and stunning presentation.
Why Neapolitan Cake is a Must-Try Dessert
A Flavor for Everyone
Not everyone agrees on the best cake flavor. Some people crave the deep, indulgent richness of chocolate, while others prefer the light, creamy sweetness of vanilla. Then there are those who enjoy the fresh, fruity essence of strawberry. With a Neapolitan cake, there’s no need to choose—it offers a taste of all three in every slice.
Visually Stunning and Perfect for Special Occasions
Neapolitan cake is more than just delicious; it’s also a work of art. The distinct layers of pink, white, and brown create a striking contrast, and the striped buttercream frosting adds an elegant touch. Whether served at a birthday party, anniversary, or family gathering, this cake is sure to impress.
Versatile and Customizable
While the classic Neapolitan cake sticks to the traditional flavors, bakers can easily get creative. Want a richer chocolate layer? Add melted dark chocolate or espresso powder. Prefer a tangy strawberry layer? Try incorporating fresh strawberry puree. Even the frosting can be customized with different techniques, from rosettes to drip designs.
Expert Tips for the Perfect Neapolitan Cake
Balancing Flavors and Textures
One of the key elements of a great Neapolitan cake is achieving a balanced taste between the three layers. The chocolate should be deep and decadent but not overpowering. The vanilla should be light and fluffy, acting as a neutral bridge between the chocolate and strawberry. The strawberry layer should have a natural fruitiness without being overly sweet.

To achieve this balance, use high-quality ingredients, including pure vanilla extract, real cocoa powder, and fresh strawberries. Artificial flavors can make the layers taste overly sweet or artificial, detracting from the natural harmony of the cake.
Achieving Even Layers
A well-made Neapolitan cake should have distinct, even layers that are the same height. To achieve this:
- Use a kitchen scale to measure the batter evenly for each layer.
- Bake the cakes at the same time on the center oven rack to ensure even cooking.
- Trim the tops of the cakes if necessary to create a level surface before stacking them.
The Secret to Smooth Buttercream Stripes
The striped buttercream finish is one of the defining features of this cake. To create clean, even stripes:
- Apply each color in sections, using a piping bag for a cleaner finish.
- Use a bench scraper to smooth the buttercream while keeping the colors distinct.
- Chill the cake between frosting applications to prevent smudging.
Making the Ice Cream Cone Topper
The whimsical ice cream cone topper adds a playful touch to the cake. To make it look realistic, use an ice cream scoop to shape chilled buttercream into “scoops” and place them on a sugar cone. Chilling the cone before placing it on the cake ensures it holds its shape.
A Trio of Tasty Layers: Ingredients
Vanilla Cake & Buttercream
- ½ recipe Vanilla Cake
- ½ recipe Vanilla Buttercream
Strawberry Cake & Buttercream
- ½ recipe Strawberry Cake
- ½ recipe Strawberry Buttercream
- 3-4 drops red or pink gel food coloring (for a vibrant pink hue)
Chocolate Cake & Buttercream
- ½ recipe Chocolate Cake
- ½ recipe Chocolate Buttercream
Crafting Sweet Perfection: Directions
Step 1: Baking the Cakes
- Preheat oven to 350°F. Grease the bottoms of three 8-inch cake pans with non-stick spray.
- Prepare the cake batters:
- Vanilla Layer: Mix ½ recipe of vanilla cake.
- Strawberry Layer: Prepare ½ recipe of strawberry cake, adding gel food coloring.
- Chocolate Layer: Prepare ½ recipe of chocolate cake.
- Bake all cakes for 28-30 minutes or until a toothpick inserted comes out clean.
- Let cakes cool completely on a wire rack. If making in advance, wrap in plastic and store at room temperature for a day or freeze for up to 3-6 months.
Step 2: Making the Buttercream
- Prepare vanilla, strawberry, and chocolate buttercream separately.
- Cover each batch with plastic wrap until needed.
Step 3: Stacking & Crumb Coating
- Trim the tops of the cakes to create even layers.
- Assemble the cake layers:
- Place the vanilla cake on a cake board and spread a thin layer of vanilla buttercream on top.
- Stack the strawberry cake on top and spread a layer of strawberry buttercream.
- Add the chocolate cake as the final layer and spread a layer of chocolate buttercream.
- Apply a thin crumb coat to the sides of the cake. Use a bench scraper to smooth out excess frosting.
- Refrigerate the cake for 30 minutes to set the crumb coat.
Step 4: Decorating the Cake
- Apply the final buttercream coating using an icing spatula or piping bags for clean stripes.
- Use a bench scraper to blend the buttercream colors for a smooth finish.
- Refrigerate the cake to set the frosting.
Step 5: The Ice Cream Cone Topper
- Chill leftover buttercream for a few minutes.
- Use an ice cream scoop to shape the chilled buttercream into scoops.
- Place scoops onto a sugar cone, then refrigerate until firm.
- Insert a wooden skewer into the cone and carefully place it on top of the cake for a fun, ice-cream-inspired decoration.
Sweet Indulgence: Nutritional Info
- Serving Size: 1 slice (out of 20 servings)
- Calories: ~400-500 per slice
- Carbohydrates: 50g
- Sugar: 30g
- Fats: 20g
- Protein: 5g
Enjoy this Neapolitan Delight Cake, a whimsical mix of chocolate, vanilla, and strawberry flavors in every bite!
Frequently Asked Questions About Neapolitan Cake
1. Can I Make This Cake in Advance?
Yes! You can bake the cake layers a day ahead and wrap them tightly in plastic wrap to keep them fresh. You can also store the buttercream in an airtight container at room temperature for a day or refrigerate it for up to a week. When ready to assemble, bring the buttercream to room temperature and re-whip it for a smooth texture.
2. How Do I Store Neapolitan Cake?
Once assembled, the cake can be stored in the refrigerator for up to three days. Cover it with a cake dome or plastic wrap to prevent it from drying out. Before serving, let it sit at room temperature for about 30 minutes to allow the buttercream to soften.
3. Can I Use Boxed Cake Mixes Instead of Homemade Batter?
While homemade cake provides the best flavor and texture, you can use boxed cake mixes if you’re short on time. However, avoid using canned frosting, as it won’t provide the same creamy texture needed for the buttercream stripes.
4. What If I Don’t Have Three Cake Pans?
If you only have one or two cake pans, you can bake the layers in batches. Simply divide the batter into separate bowls and bake each layer individually. Be sure to clean the pan between uses and grease it well to prevent sticking.
5. Can I Make This Cake Without Food Coloring?
Yes! If you prefer to avoid artificial coloring, you can achieve a natural pink hue by using strawberry puree or freeze-dried strawberry powder. The chocolate and vanilla layers will naturally have their distinct colors without the need for added dyes.
6. How Can I Make a Smaller Version of This Cake?
If a full-size Neapolitan cake is too large, you can make a smaller version by baking the layers in 6-inch cake pans. Alternatively, you can use extra batter to make cupcakes, which are easier to portion and serve.
Final Thoughts: Why Neapolitan Cake Is Worth the Effort
Neapolitan cake is a labor of love, but the result is well worth the effort. This cake captures the best of three classic flavors, making it a perfect choice for any celebration. Whether you’re making it for a birthday, an anniversary, or just because, this cake is guaranteed to impress with its striking appearance and delicious taste.
From its rich history to its endless customization possibilities, Neapolitan cake is more than just a dessert—it’s a creative expression of flavors and textures that brings joy to any table. If you love baking and want to challenge yourself with a rewarding, beautiful cake, the Neapolitan delight is the perfect project to try.
So gather your ingredients, preheat your oven, and get ready to create a masterpiece that will delight everyone who takes a bite!