

")

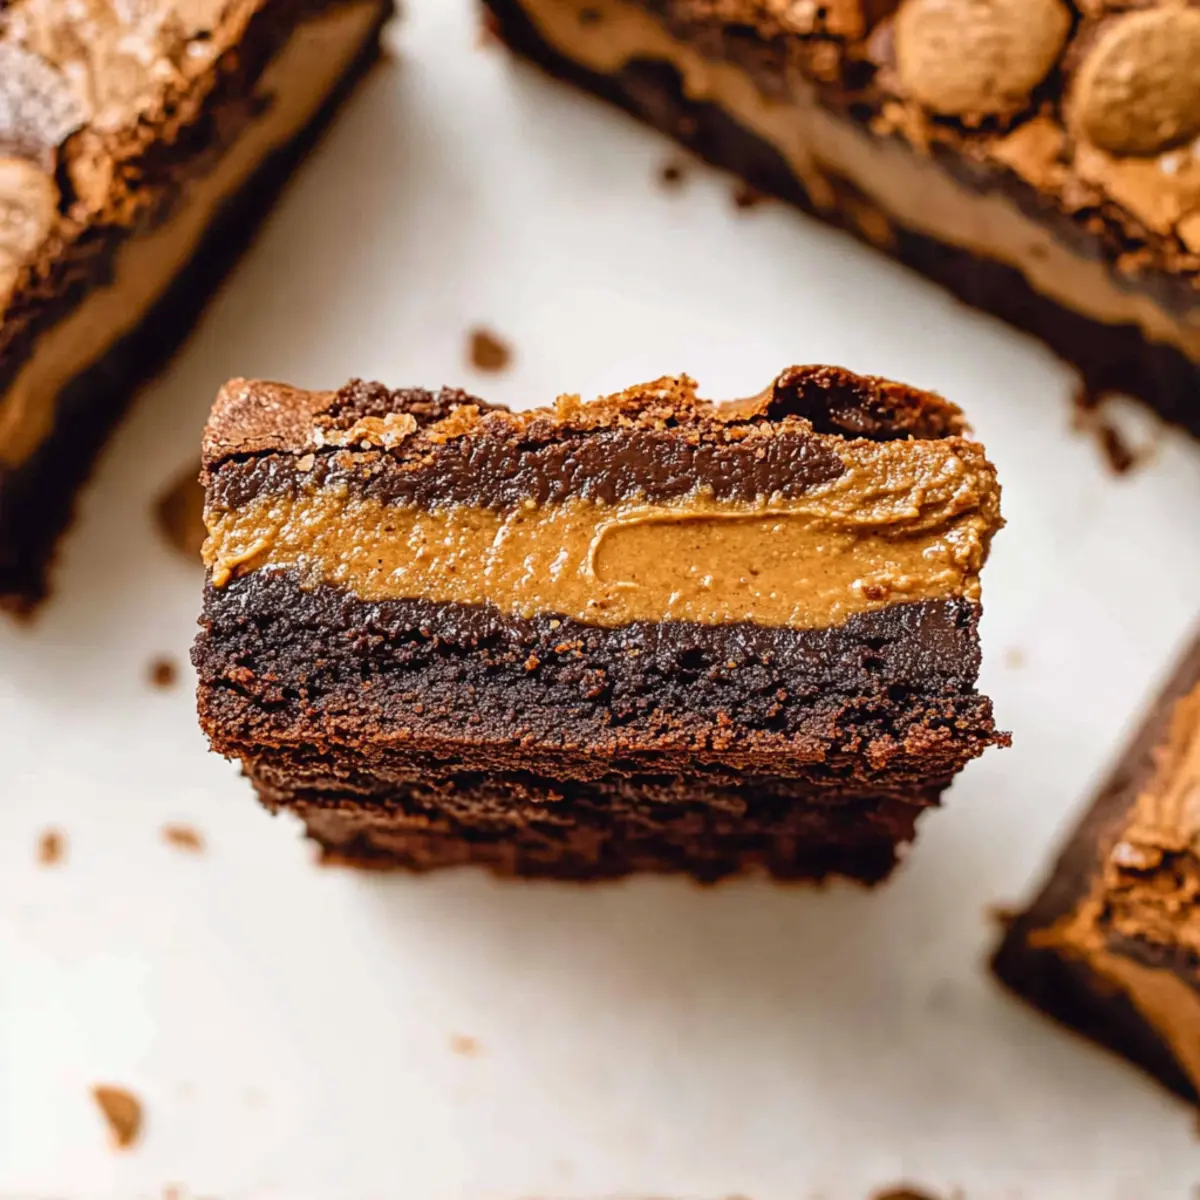
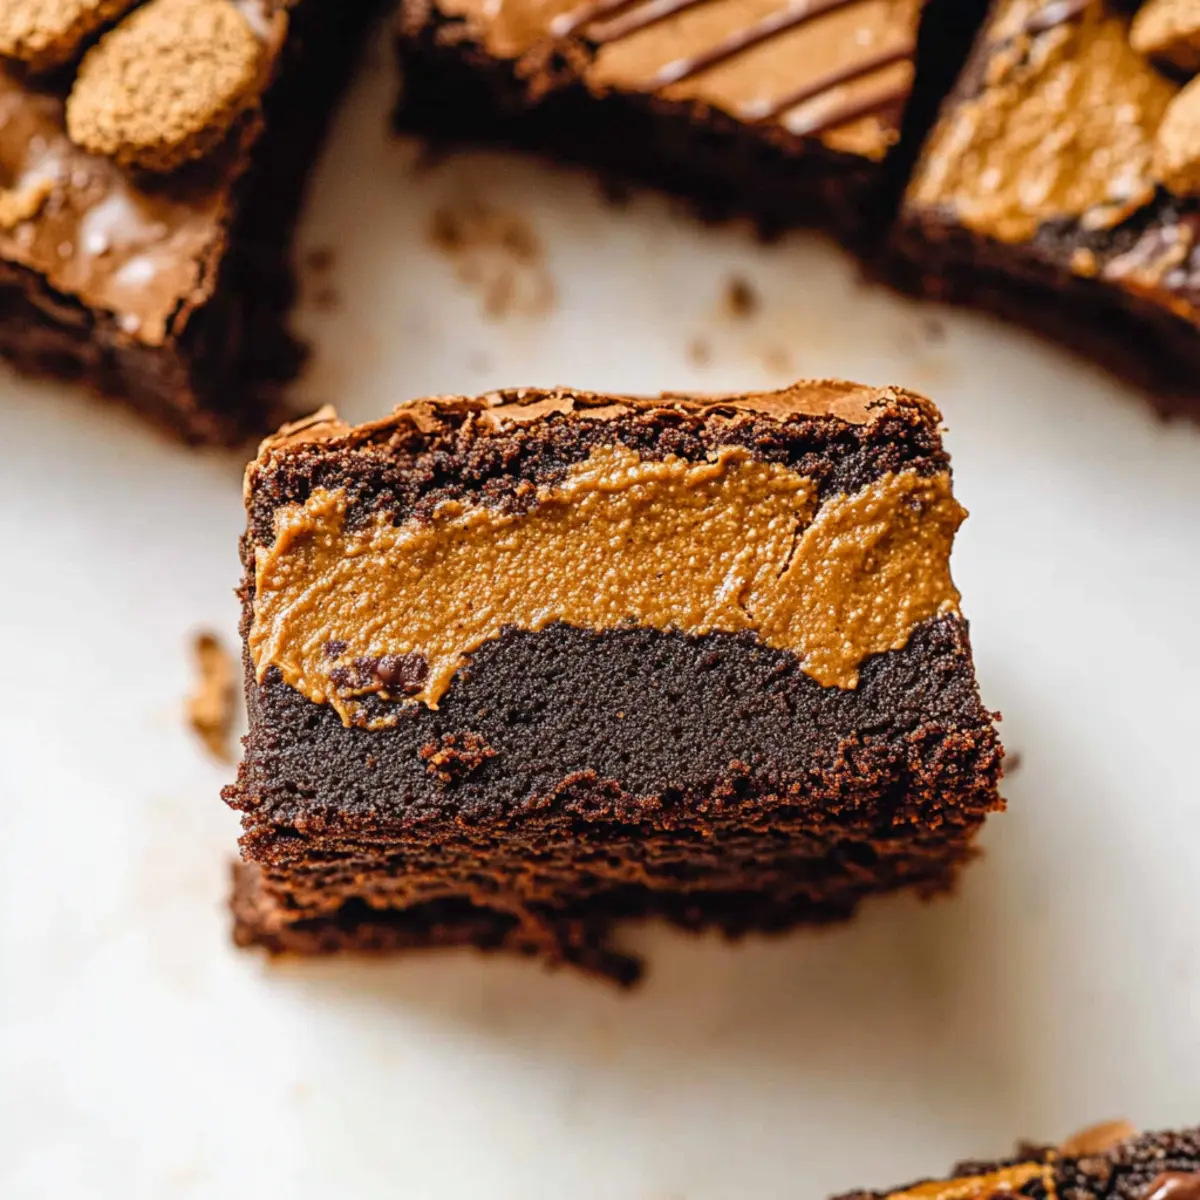
As I stood in my kitchen the other day, the aroma of melting chocolate filled the air, instantly transporting me to a dessert paradise. I couldn’t help but think of my latest obsession—fudgy Biscoff brownies. These delightful treats combine the rich flavors of chocolate and the unmistakable caramel goodness of cookie butter, making them a must-try for any home chef. What’s more, this recipe is incredibly easy to whip up, meaning you can indulge without spending hours in the kitchen! With a gooey, oozing center that contrasts beautifully with a crunchy Biscoff topping, each bite is like a warm hug on a plate. Ready to impress family and friends or simply treat yourself? Let’s dive into making these heavenly Biscoff brownies!
Why are Biscoff Brownies a must-try?
Indulgent Flavor Combination: The unique blend of chocolate and Biscoff cookie butter will have you swooning with every bite, making it an irresistible treat.
Effortless Preparation: Despite their luxurious taste, these brownies are easy to make, perfect for both beginner and seasoned bakers looking to whip up a delightful dessert without a fuss.
Gooey Center: The molten cookie butter at the heart of each brownie creates an incredible contrast of textures that elevates this dessert from the ordinary to the extraordinary.

Crowd-Pleasing Delight: Whether you’re hosting a gathering or enjoying a quiet night in, these brownies are guaranteed to impress family and friends—everyone will be asking for the recipe!
Versatile Variations: Feel free to customize your brownies by mixing in your favorite nuts or swapping the cookie butter with different spreads; the possibilities are endless!
Perfect for Indulgent Pairings: Serve warm with a scoop of vanilla ice cream for a decadent dessert experience that will leave you craving more.
Biscoff Brownie Ingredients
For the Brownie Base
• Biscoff cookie spread – Provides a creamy, spiced flavor; substitute with other cookie or nut butters for varied taste.
• Unsalted butter – Adds richness and moisture; always use unsalted for better salt control.
• Chopped semi-sweet chocolate (70%) – Enhances the chocolate flavor and contributes to the fudginess; feel free to use milk chocolate for a sweeter treat.
• White granulated sugar – Sweetness and structure; brown sugar can be swapped for a deeper flavor.
• Large eggs (2) + Egg yolk (1) – Provides structure and leavening; omitting eggs changes texture significantly.
• Pure vanilla extract – Adds depth of flavor; opt for high-quality vanilla for the best results.
• Oil (canola or vegetable) – Adds moisture and tenderness; melted coconut oil is a suitable alternative.
• All-purpose flour – Provides structure; a gluten-free flour blend works as a substitute for those with dietary restrictions.
• Dutch process cocoa powder – Delivers a rich chocolate taste; natural cocoa powder can be used but will subtly alter the final result.
• Cornstarch – Contributes to a chewy texture; skipping this will slightly affect the texture.
• Salt – Enhances sweetness and flavor; essential for a well-balanced brownie.
For the Mix-ins
• Biscoff cookie pieces – Adds delightful texture and flavor; chop finely for better incorporation.
• Mini chocolate chips – Provides additional chocolatey bursts; dark chocolate chips deliver a richer flavor profile.

Step‑by‑Step Instructions for Biscoff Brownies
Step 1: Prepare Your Baking Pan
Start by preheating your oven to 325°F (163°C) and gather an 8×8-inch baking pan. Line the bottom and sides of the pan with parchment paper, allowing some overhang for easy removal later. This crucial step ensures your fudgy Biscoff brownies release smoothly after baking, giving you perfectly square edges to admire.
Step 2: Freeze the Biscoff Spread
To make handling easier, place the Biscoff cookie spread into the freezer for about 15-20 minutes. This firming up process will allow it to hold its shape better when you incorporate it into the brownie layer. Once frozen, remove it from the freezer and slice it into small rounds, making it easier to create that gooey center.
Step 3: Melt Chocolate and Butter
In a medium saucepan over low heat, melt the unsalted butter and chopped semi-sweet chocolate together, stirring frequently until smooth and glossy. This should take around 5-7 minutes. Once fully melted, remove the saucepan from heat and let the mixture cool slightly before adding it to the batter, ensuring it doesn’t cook the eggs later on.
Step 4: Whisk the Egg Mixture
In a large mixing bowl, combine the large eggs, egg yolk, and white granulated sugar. Using an electric mixer, whisk the mixture on high speed for about 5 minutes, or until it’s pale, thick, and fluffy. This aeration step is essential for achieving that tender, fudgy texture in your Biscoff brownies.
Step 5: Combine Wet Ingredients
Gently pour the slightly cooled chocolate-butter mixture into the whisked egg mixture, followed by the vegetable oil and pure vanilla extract. Using a spatula, carefully mix until everything is combined and there are no visible streaks. This will make your Biscoff brownies rich and flavorful.
Step 6: Fold in Dry Ingredients
In another bowl, whisk together the all-purpose flour, Dutch process cocoa powder, cornstarch, and salt. Gradually fold this dry mixture into the wet ingredients using a spatula, carefully mixing just until combined. Be mindful not to overmix, as it can affect the brownie’s texture, leading to less fudginess.
Step 7: Add Mix-ins
Gently fold in the chopped Biscoff cookie pieces and mini chocolate chips, ensuring even distribution throughout the batter. This not only enriches the flavor profile of your Biscoff brownies but also gives you delightful texture bursts in every bite.
Step 8: Assemble the Brownies
Pour half of the brownie batter into the prepared pan and spread it evenly. Next, take your frozen Biscoff rounds and layer them on top of the batter, creating a deliciously gooey center. Carefully spoon the remaining batter over the top, spreading it gently to fully cover the cookie spread.
Step 9: Decorate and Bake
For an extra touch, decorate the top of your brownies with a few Biscoff cookie pieces, pressing them lightly into the surface. Place the pan in the preheated oven and bake for 40-50 minutes. The center should look slightly underdone when you take them out, which ensures a fudgy texture after cooling.
Step 10: Cool and Serve
Allow your fudgy Biscoff brownies to cool completely in the pan on a wire rack. After about an hour, use the parchment overhang to lift them out. Cut the brownies into squares and serve warm for that delightful chocolate and cookie butter experience. Enjoy every blissful bite!

Make Ahead Options
These fudgy Biscoff brownies are perfect for busy home cooks looking to save time! You can prepare the brownie batter up to 24 hours in advance by mixing all the wet and dry ingredients separately and storing them in airtight containers in the refrigerator. The Biscoff cookie spread can also be frozen for up to 3 months. When you’re ready to bake, simply bring the ingredients to room temperature, fold in the mix-ins, and layer the cookie spread as usual. This way, your brownies come out just as delicious as if made from scratch on the spot, leaving you with more time to enjoy your day!
Expert Tips for Biscoff Brownies
Quickly Handle Cookie Butter: Ensure to work quickly with the frozen Biscoff cookie spread as it can melt fast and make layering difficult.
Avoid Overmixing: When folding the dry ingredients into the wet, mix gently to maintain airiness; overmixing can deflate your brownie batter.
Bake Mindfully: Aim to remove the brownies from the oven while the center is still slightly underdone. They’ll continue to set while cooling, ensuring that fudgy texture.
Use a Kitchen Scale: For the best results in your Biscoff brownies, accurately measure flour using a kitchen scale; this will help avoid dry or dense brownies.
Customize Wisely: Feel free to add your favorite nuts but keep the proportions in mind; too many can disrupt the chewy texture.
Store Properly: Once cooled, store brownies in an airtight container at room temperature for up to 4 days to maintain freshness.
What to Serve with Biscoff Brownies
Indulging in fudgy delights shouldn’t stop at Biscoff brownies alone! Elevate your dessert experience with these delightful pairings.
-
Vanilla Ice Cream: A scoop of creamy vanilla ice cream perfectly complements the rich chocolate and cookie butter, creating a heavenly contrast in temperature and texture.
-
Espresso: The bold bitterness of freshly brewed espresso enhances the sweetness of the brownies, making for a delightful contrast that coffee lovers will adore.
-
Whipped Cream: Light, fluffy whipped cream adds a touch of indulgence, balancing the rich flavors of the brownies while adding an airy texture to each bite.
-
Fresh Berries: Juicy raspberries or strawberries provide a refreshing tartness that cuts through the sweetness of the brownies, making each forkful even more delightful.
-
Chocolate Sauce: Drizzle warm chocolate sauce over the brownies for an extra touch of decadence, intensifying the chocolate flavor and adding a luxurious shine.
-
Milkshake: Blend together cookie butter and milk for a fun, indulgent milkshake that mirrors the flavors of the brownies and leaves your taste buds dancing.
-
Nutty Topping: Sprinkle crushed walnuts or pecans on top of the brownies for a delightful crunch that adds texture and a nutty flavor contrast.
-
Chai Tea: A warm cup of chai tea with its fragrant spices pairs wonderfully, enhancing the dessert’s warmth and indulgence while introducing an aromatic twist.
How to Store and Freeze Biscoff Brownies
Room Temperature: Store your Biscoff brownies in an airtight container at room temperature for up to 4 days, ensuring they stay moist and delicious.
Fridge: For longer freshness, you may refrigerate the brownies for up to a week. Just make sure to let them come to room temperature before serving for the best flavor and texture.
Freezer: Freeze the brownies for up to 30 days wrapped tightly in plastic wrap and then in foil. Thaw them for about 1 hour at room temperature before enjoying again.
Reheating: If serving warm, simply microwave a brownie for 10-15 seconds, allowing that gooey Biscoff center to return to its melty goodness.
Biscoff Brownies: Flavor Variations
Feel free to explore these scrumptious variations that will allow you to tailor the brownies to your taste.
- Nuts: Add a handful of chopped walnuts or pecans for a delightful crunch, balancing the softness of the brownie.
- Nut Butter: Swap out the Biscoff cookie spread for peanut or almond butter for a nutty twist that still satisfies your sweet tooth.
- Swirled Fudge: For decadent indulgence, swirl in a chocolate fudge sauce before baking, intensifying the chocolate experience.
- Minty Fresh: Add a few drops of peppermint extract for a refreshing minty flavor that complements the chocolate beautifully.
- Spiced Up: Mix in a teaspoon of cinnamon or a pinch of chili powder for a warm spice note that dances on your palate.
- Coconut: Incorporate shredded coconut into the batter for added texture and a tropical flair. It will complement the caramel notes perfectly.
- Fruit Explosion: Toss in a few dried cherries or cranberries for a fruity burst that brings a tart contrast to the rich brownie.
- Biscoff Swirl: Instead of a center, create a luscious Biscoff swirl on top of your batter before baking for an elegant finish.
No matter how you choose to customize your Biscoff brownies, the end result will be a comforting treat that reflects your personal flair. Dive into these creative swaps and elevate your dessert experience even further! And if you’re intrigued by how flavors mingle, check out our guide on mixing sweet and savory ingredients.
Biscoff Brownies Recipe FAQs
How can I ensure my Biscoff cookie spread is the right consistency?
Absolutely! The best way to achieve the right consistency is to freeze your Biscoff cookie spread for about 15-20 minutes before using it. This makes it easier to handle and creates a lovely gooey center in your brownies. After freezing, simply slice it into small rounds for even distribution throughout your batter.
What’s the best way to store Biscoff brownies?
Store your brownies in an airtight container at room temperature for up to 4 days. This keeps them moist and delicious. If you need them to last longer, refrigerate them for up to a week, but let them return to room temperature before serving to maintain their texture.
Can I freeze Biscoff brownies?
Yes, you can! To freeze your Biscoff brownies, wrap them tightly in plastic wrap, then place them in a freezer-safe bag. They will keep well for up to 30 days. When you’re ready to enjoy, simply thaw them at room temperature for about an hour, or microwave a brownie for 10-15 seconds to bring back that tempting gooeyness.
What should I do if my brownies come out too dense?
If your brownies turn out too dense, it’s likely due to overmixing the batter. When folding in dry ingredients, mix gently until just combined. Another tip is to ensure you’re using the correct measurements; using a kitchen scale for flour helps avoid adding too much.
Are there any allergy considerations for this recipe?
Absolutely! This recipe contains eggs, gluten from the all-purpose flour, and potentially nuts if you choose to add them as mix-ins. For those with allergies, consider substituting gluten-free flour instead of all-purpose flour, and always check the labels of your cookie spread to ensure it’s safe for your dietary needs.
How do I achieve that perfect fudgy texture in Biscoff brownies?
To achieve a luscious, fudgy texture, ensure you’re not overbaking your brownies—aim for a slightly underdone center before cooling. Remove them from the oven when they still look a bit soft; they will continue to cook while cooling in the pan. This will elevate the overall experience with a delightful melt-in-your-mouth moment!
Decadent Biscoff Brownies That Will Melt Your Heart
Equipment
- 8x8-inch baking pan
- medium saucepan
- large mixing bowl
- electric mixer
- spatula
- Whisk
Ingredients
For the Brownie Base
- 1 cup Biscoff cookie spread Provides a creamy, spiced flavor; substitute with other cookie or nut butters for varied taste.
- 1/2 cup unsalted butter Adds richness and moisture; use unsalted for better salt control.
- 4 oz chopped semi-sweet chocolate (70%) Enhances the chocolate flavor and contributes to the fudginess.
- 1 cup white granulated sugar Sweetness and structure; brown sugar can be swapped for a deeper flavor.
- 2 large eggs Provides structure and leavening; omitting eggs changes texture significantly.
- 1 large egg yolk Provides structure and leavening.
- 1 teaspoon pure vanilla extract Adds depth of flavor; opt for high-quality vanilla.
- 1/4 cup oil (canola or vegetable) Adds moisture and tenderness; melted coconut oil is a suitable alternative.
- 1 cup all-purpose flour Provides structure; a gluten-free flour blend works as a substitute.
- 1/3 cup Dutch process cocoa powder Delivers a rich chocolate taste.
- 1 tablespoon cornstarch Contributes to a chewy texture.
- 1/2 teaspoon salt Enhances sweetness and flavor.
For the Mix-ins
- 1/2 cup Biscoff cookie pieces Adds delightful texture and flavor; chop finely for better incorporation.
- 1/2 cup mini chocolate chips Provides additional chocolatey bursts.
Instructions
Step-by-Step Instructions for Biscoff Brownies
- Preheat the oven to 325°F (163°C) and line an 8x8-inch baking pan with parchment paper.
- Place the Biscoff cookie spread in the freezer for 15-20 minutes.
- Melt the unsalted butter and chopped semi-sweet chocolate together in a medium saucepan over low heat.
- Whisk the eggs, egg yolk, and sugar in a large bowl until pale and fluffy.
- Pour the cooled chocolate-butter mixture into the egg mixture, mixing well.
- Fold in the flour, cocoa powder, cornstarch, and salt until just combined.
- Gently fold in the Biscoff cookie pieces and mini chocolate chips.
- Pour half of the batter into the prepared pan, layer the frozen Biscoff rounds, then cover with remaining batter.
- Decorate the top with Biscoff cookie pieces and bake for 40-50 minutes.
- Cool the brownies completely in the pan before lifting them out and cutting into squares.